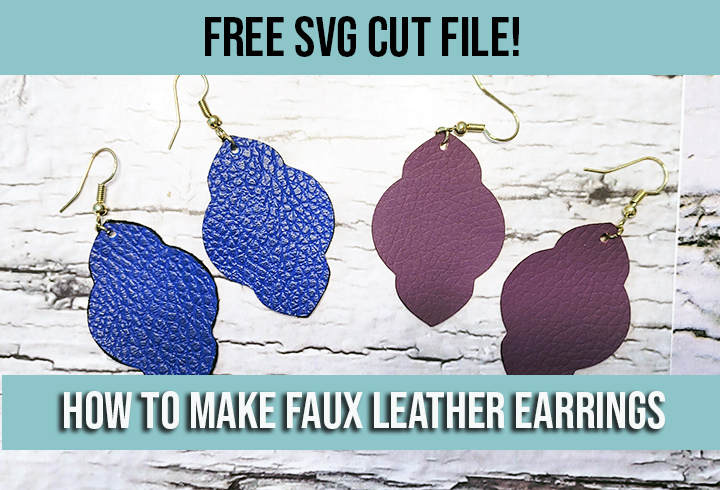
Ultimate guide to faux leather earrings with a Cricut
July 31, 2024
Making earrings with your Cricut machine is so easy. You just need to start with an earring SVG cut file and than you can cut out with so many different fabrics. You don’t need a lot of complicated supplies to get started, most you can find on amazon or at your local craft shop. Once you get started you will see that you mind will be flooded with lots of ideas for making unique earrings that you can’t find anywhere else.
My post contains some affiliate links so if you make a purchase after clicking on a link I may receive a commission but it will not cost you anything. Read my disclosure here.
What supples do I need to make earrings with my Cricut?
Making earrings is easy to do and you don’t need a lot of supplies to get started. I would recommend starting with a few simple design and than slowly advancing. That way you can slowely add more supplies as you advance.
It’s good to start off with a few jewelry making supplies. You don’t want to use your home repair pliers or tools, it’s better to use dedicated jewelry tools, jewelry making supplies are designed to be used with delicate material. It’s easy to bend or break things if you use big clumsy pliers and jewelry pliers are made at just the right shape to make them easy to use.
Using a Cricut machine to make jewelry is super fun because you can cut out lots of complicated shapes, use unique materials like heat transfer vinyl or glitter vinyl as well so you can make unique designs just for you.
To get the free SVG’s just click on the links below to go to the blog post there you will find the newsletter signup. Afterwards you will have the file sent direct to your inbox. If you love making crafts with SVG cut files you can also find lots more free SVG’s here.
Some earring SVG cut files include a hole and some don’t. If your pattern does include a hole but you prefer to hand punch you can allows delete it in your software. But the benefit of there being a hole is that it helps you with the placement. Possibly your Cricut machine did not cut all the way through depending of the material and blade you are using. So you can use a hand punch to clean up the hole to attach your earring hook.
If you are using thick material such as leather you can use a leather hole punch to get a clean line. But if you are using thinner material than you can use a craft punch which is easy to find at places such as amazon.
If you have an SVG cut file without a hole than you can easily eyeball it. It’s important to put the hole in the center so that your earring hangs straight. If you have a simple design such as a teardrop than its easy to find the center. But if you have a more complicated design than I recommend printing the design out with paper first to find the center so that you dont waste your expensive fabric.
If you are looking for some ready made SVG cut file for crafting than check out my SVG shop. Here you can find lots of SVG files for making a variety of crafts! Click the link here to take a look.
Check out these earring cut files in my shop you are sure to love:
To cut out the design you will need a sticky mat to use with your cricut machine. I recommend one of the stronger mats such as the purple colored mat which has the strongest grip. Another useful tip is to use some painters tape or washi tape, anything that is removable. This will help hold down the fabric so it doesn’t shift while cutting. Because the more often you use a mat the more the stickiness wears down, even if you clean it. And I find the tape can be reused a few times to save on cost.
When cutting out the fabric it can be handy to keep an eye on your cutting blade to make sure it stays clean an no material builds up on it, so you cut a clean cut. Faux leather is easier to cut out because it is not so bulky and there is a huge selection of prints and colors to purchase which makes it more fun.
If you are cutting out earrings that are not symetrical than either mirror one side (left or right) if you cut both out at the same time. If you prefer to cut them out one at a time than after the first earring is cut out you can flip the fabric over to cut a mirror image.
What material to use
There are lots of different materials you can use to make earrings, really any thing you can cut or punch a hole through, you can use. Some popular choices are faux leather,glitter vinyl, and leather.
There are lots of places to buy faux vinyl including etsy and amazon, here are some you may find interesting.
If you are using a faux leather and it has a white backing to it, than there are a few ways to cover that up to make the earrings look professional. Check out this blog post I wrote on how to add a back to faux leather .The first way to embelish the back is to cut out a mirror image of the earring out of a complimentary fabric and glue it or use heat and bond to attach it to the back. This will make the earrings reversable and you can get creative and use different colors or textures. Another way is to use heat transfer foil to make the reverse side metalic and shiny. Or if you have some heat transfer vinyl you can adhere that to the back side. If your fabric has a white edge and you don’t like how it looks, than you can cover that up with some fabric paint or a sharpy marker.
I purchased this foil and adhesive from signsupplycanada.ca. If you are using a different product make sure to read the manufacturers guidelines. I also recommend doing a test first on a scrap peice of vinyl before getting started to double check all your settings. All material can require small changes.
Heat press
You can use any device you have available if you are going to heat transfer some foil or use heat and bond on the back of the faux leather. Today I am going to use this mini travel iron that I bought at my local Walmart, you can find one similar here. I enjoy trying new gadgets and I just picked this up recently so I am having fun trying it out. You could also use a heat press or a Cricut brand mini press, or even a household iron if that is what you have. What I like about the smaller irons are that they are easier to use with small delicate items such as earrings.
What blade to use
What blade you select depends on the fabric you are using. If you are using faux leather than you can use the Fine point blade. If you are using a heavy leather than you will need the deep cut blade. I recommend going through the preset settings on Design Space and the blade setting should be preprogramed if you select the fabric you are using from the list provided.
For any other fabric that is not super thick than you can get away with using the fine point blade that was include with your machine. But it is always a good idea to test out with a scrap peice of material first to check your settings.
Fabric scissors
If you are cutting faux leather it can sometimes frey a bit around the edges. So it’s important to use a sharp and precise pair of craft scissors to clean up the edges. But for sturdier non fraying fabric like some glitter vinyl sheets you can get away with the scissors you may already have at home.
Earring making supplies
To make earrings you will need to buy some earring making supplies, also known as findings. This includes jump rings and earring hook and backs. I find it convenient to get a variety pack of both jump hoops and earring hooks. It’s handy to have a variety of sizes as well as different colors including gold, silver and bronze. That way you can mix and match to work best with the earring pattern and fabric you are using.
If you are concerned about loosing your earring or having it fall out, you can also use little plastic backings. These are also handy to keep your earrings in place if you put your handmade earrings on to display cards for gifting or selling.
If you have sensitive skin a lot of people find it more comfortable to buy silver earring hooks to help with sensitivities. I recommend cleaning your earring hooks with rubbing alcohol before wearing them.
For todays tutorial I will be using 4mm which is the smallest. But you can use the size that you like the look of the most.
Earring making tools
To make the earrings I strongly recommend that you purchase some jewelry making tools. If you use the tools that you may have laying around in your junk drawer in your kitchen or something from your tool box than you will be disapointed and frustrated. It will make your life easier to buy jewelry making tools.
Jewelry tools include unique pliers designed for use on small delicate items. You can buy jewelry making tool sets on line here. But if you don’t want to buy a set than you will need to get at lease a pair of flat nose pliers for opening the jump rings and handling the earrings hooks. You can add more tools as you advance.
Today I will be using the jewelry set shown above that I bought on Amazon. It includes a flat nose plier and a jump ring opener which I will use in the tutorial below.
Adhesive
If you are doing more complicated designs than you may need some glue or adhesive to keep it all together. You can use a craft glue that you can buy at your local department or craft store or online. You may also want some toothpicks, skewers or a paint brush to help you to guide the glue into place.
If you want to adhere a second peice of faux leather on the back than I recommend using heat n’ bond, the red package. It is a wonderful material that is really game changing. You can attach it to the material using the lowest heat setting.
What if I don’t have a Cricut
If you don’t have a cricut and you still want to make your own faux leather earrings from scratch you can still make them. If you purchase a very simple pattern after you download it you can print the design onto paper and cut out the paper to make a stencil. Than use the stencil to trace around it with a fabric marker and cut out your shape.
Cricut has a few different mats and each one has a different level of stickiness. The mats are color coordinated so you can easily see which one to pick. If you are using faux leather than you can use the green mat or if you are using heavier fabric like glitter vinyl or thick faux leather than you can use the strong purple mat. If you are cutting out leather than definitly go with the purple mat.
A helpful tip to stop the fabric from moving around is to use painters tape around the edge. This is an easy way to guarantee the fabric won’t shift. Because if the fabric shifts it can cause miss cuts. Another good tip is to cut out the fabric to the size you need. If you use large peices to cut out it can cause clumsy cuts that will ruin your design.
Steps to make earrings
Today we are going to make this easy earring design using this simple svg cut file that you can get along with the free cheat sheet by using the sign up form here. The free SVG cut file and cheat sheet will be sent immediatly to your inbox.
Step 1 Uploading to Design Space
Upload the SVG cut file to Design Space. The files include with or without holes. At this point you can choose which one to print. Press ungroup and turn off the layers you don’t want to cut out. Now press “Make it”
On the next page you will be shown where the earrings will be cut out on your matt. If you want to move them around the matt this is the time. Grab the designs with your curser and make a note of the measurements so you can place your fabric in the same place. If your sticky matt is getting worn in the top left corner it’s a good practice to use different parts of your matt where there is more adhesion.
On the next screen you will see the options to select your settings. For faux leather I will be using the faux leather (paper thin) setting. I recommend doing a test on scrap fabric first. Some faux leather can be quite thick and will not cut even after several passes. You may need to do a lot of trial and error first so you dont waste your fabric. You can also set the pressure to more to get through thicker fabric.
Step 2 Cutout the earrings
It can be really beneficial to just make one pair at a time. I recommend cutting out the size of the faux leather you need to cut out one peice. It can be tempting to use the entire sheet of faux leather so that there is less waste but it can cause the fabric to shift and ruin your design. Instead measure out a piece of material slightly larger than your design.
Step 3 Planning the backside
If you are going to make the reverse side decorative than now is the time to plan for it. Because we are making this easy design you could cut out the same design and glue the two sides together or use some HTV on the back to add an interesting design element.
I’m going to put gold foil on the back so the earrings are reversable. In the image below you can see that I cut out the adhesive and the foil to the same size as the faux leather. I will be putting the foil on first with my mini iron before I cut out the final earring shape. But if you prefer you can attach the foil afterwards.
First I apply the adhesive sheet. I have several layers of flannel with a board underneath and a layer of muslin on top to protect my work surface. I have my mini iron set to low and I am using a peice of parchment paper to protect the iron so nothing melts onto it.
Afterwards I remove the plastic backing (shown below) and place the gold foil on top. Again using the parchment paper I now set my iron to the second heat setting and press so that the foil adheres to the fabric. When it is cold I will remove the plastic backing.
Now that your file is prepared in design space I will go ahead and cut out my fabric shapes using my Cricut machine. I placed the faux leather with the leather side down and the back side up. If your mat is older and you want to make it more secure you can use painters tape around the edge. This mat is new so it stuck firmly.
Before you remove your cut design from the Cricut machine make sure to check that it cut all the way through the fabric. If not than you can push the “C” button to run it through again.
Step 5 Finishing the edge
Now that the earring peices are cut out you can finish the edges before adding your hook. Faux leather sometimes has a white fluffy backing which can be visible after its cut. A simple way to finish the edge is to use a black marker and carefully run it along the edge. Be careful not to get any on your material because it may not come off. I recommend doing a test on a scrap first to see the result. Different markers have different formulas, and some may smear after you use them or they may bleed into the fabric. I recommend leaving them to dry before handling them more to attach the hook so you don’t smear the ink.
Step 6 Make the hole
Now that your earring is cut out and the back attached you can make the hole to attach your earring hook.
Grab your earring hoop and if the hole has not been properly formed while cutting than use a craft punch to make a nice clean hole. The craft punch can leave an indent in the faux leather so you may want to punch from the back side.
Step 5 Attach earring hook
Now your earring is ready to assemble. Grab a jump ring and pry it open with a jewerly pliers and a jump ring opening tool if you have one. You want to bend it front to back and not side to side because it will distort the hoop.
If you want to change the direction the earrings hang, you can give the little hoop on the hook a twist with your pliers.
Now you attach the earring hoop. Take your pliers and insert the earring hook into the hoop. Now using the two pliers twist the hoop back into its original shape to contain the hoop.
All done!
Now your earrings are complete. Wasn’t that easy! Making your own earrings is very satisfying and an easy craft to do. Once you have purchased all the equipment and a small assortment of faux leather you can create many pairs. If you are excited to get started on your next pair check out these free patterns on my blog here.
If you enjoyed this article please share it on pintrest.
Hi I'm Catherine and I'm so glad you've decided to stop by and make stuff with me! My blog is full of fun project for kids and busy parents.
View all posts by Catherine


