You may have seen some of the beautiful designs floating around pintrest or the internet created by crafters with a cutting machine such as a Cricut. And maybe you thought you’d like to try that too, but your not quite ready to invest in a machine or maybe you are not sure which type of machine to get yet. Depending on the design you can still try them out without a cutting machine, it just requires some patience and starting off with really simple designs.
There are lots of free designs online including some on my blog here. Feel free to download one and print the design on paper to create a stencil to outline onto fabric or paper and cut out with scissors. If the design is very simple this will work for you. You won’t get the sharp cut lines that you would with a cutting machine and you also can’t do detailed work, because it would require the patience and focus of a madman. So I definitly recommend eventually investing in a machine if making your own accessories fills your heart with joy.
Cutting out designs by hand is not the way I would recommend it, because a machine makes it so easy. But I have a lot of people asking me how to cut by hand so I created this blog post to share some of the ideas I have to do this. So just a disclaimer all the designs I create are made with the intention of being cut out with a machine. But if you are deadset on doing it by hand then here are some tips to help you.
Why trace instead of using a cutting machine?
Not everyone has a cutting machine and the ease of printing a design onto sturdy paper and then cutting it out to create a template appeals to many people. Cutting machine software can be a pain to figure out. There are always updates and not everyone is tech savvy and enjoy an old fashion way to craft. Cutting machines are expensive, not everyone wants to spend $500 on a new machine that they aren’t sure they will use often enough to validate the purchase.
How to edit a design without a machine?
When you purchase a machine such as a Cricut, you have access to the free software called Design space. In my experience all machines include a free software of some sorts. So if you don’t have the software that comes with a machine than you will have to find something else to edit the design. I use the adobe suite, this is a paid software that is used by professionals. There are free softwares on the internet such as Inkscape that you can edit designs with. I discurage you from using programs such as word because this is not what word was inteded for so it will not work well. Word is a word processing software used in offices to compile documents, not designs. It does not allow you to work with vectors, which is essential when designing SVG. SVG stands for scalable vector graphic.
Editing designs requires some practice and and much more information than I can include in this post and I will be creating a seperate post on how to edit designs.
How to print SVG file?
Use your web browser.
The easiest way to print an SVG file is to use your web browser. You simply drag and drop the dowloaded SVG file from your computer to a web browser such as Chrome, Safarai, or Firefox and it will open in a new browser. Then you press print and the print dial box opens. Unfortunately you won’t be able to edit the design other than changing whatever is available to you in your print dialog box. And in my experience the size may be different than you would get with a pdf or with the cutting machine software.
Use a PNG, PDF or JPG instead of SVG
If you purchase a cut file online you may be in luck and the designer has included other file options such as .jpg, .png or .pdf. These files can make it a lot easier for you to cut out with out a machine. You can simply double click on any of these files and it will open in either you image viewer on your computer or in Adobe reader if you select .pdf. These files should be saved, by the designer, in the correct size. This means you won’t have to fiddle with adjusting the scale of the design in your print dialog box.
Convert SVG to PDF or JPG
If you have a SVG file and there was no other file types included in the download, than you can convert the file yourself. There are several free convert softwares online you can use, one being Convertcloud.com or Convertio.co. This will give you the option to convert a SVG to almost any files type. But this may change the size so it won’t print perfectly and your editing options are limited to using the print dialog box on your computer or device.
Use a vector based software
If you open the SVG file in a vector based software such as Adobe Ilustrator or Inkscape than it will be easy for you to print. You should not have to do any editing and simply press the print button. Inkscape is a free software that you can find online, you simply select the type for you computer mac or pc etc and it will download easily. Than you can open the svg file in Inkscape to work on your project.
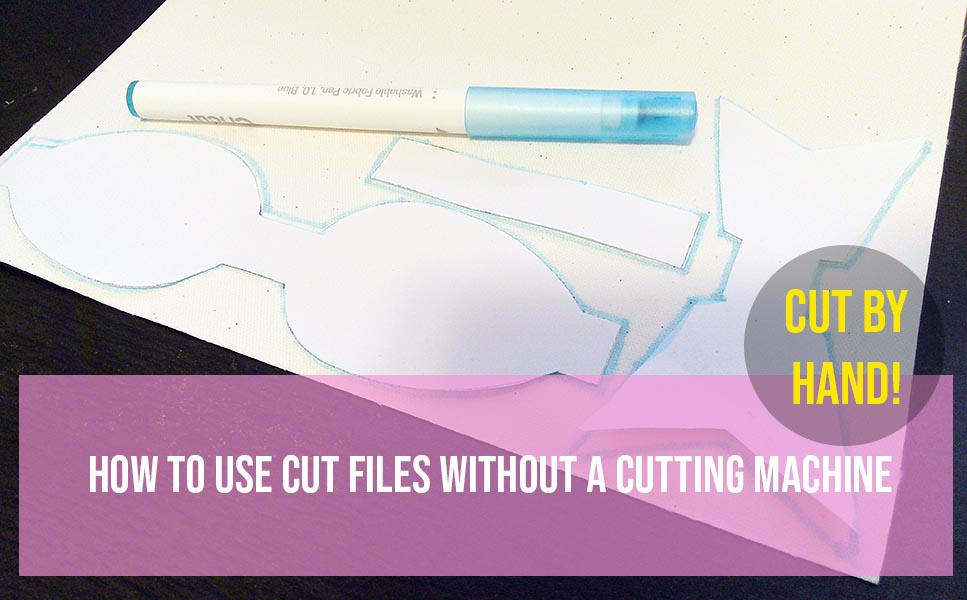
How to cut out by hand
Fabric
- Print onto paper or cardstock. Whatever paper weight can be sent through your printer.

2. Cut out using sharp fabric scissors or exacto knife

3. Trace out the design around your templates using a fabric marker. This is disapearing ink that will disapear from water and over time in 24 hr -72 hr. So you need to work fast.

You can also find stencils and templates on amazon for tracing designs directly onto faux leather without using a machine. Here are some links to check out for templates:
2 styles acrylic wallet template
How to cut elaborate designs without a machine?
If you want to cut out a more elaborate design than print the design onto sticker paper and place onto material. Than tape down the edges onto a cutting mat. Use a sharp exacto knife to cut out the shapes. This is a time consuming task and will be tedious for extrememly detailed designs.
- Print your design onto sticker paper. I used a sticker paper similar to this one found on Amazon.

2. Cut out the design you want to make. Leave as much space around the design as possible.

3. Remove the paper backing from the sticker paper and place onto the back side of your vinyl. And cut out the square.

4. Using painters tape tape onto a cutting mat.

5. With a sharp, brand new blade use an exacto knife to cut out the design. I recommend cutting out small shapes and don’t work on big shapes. This will give you the best detail.
You can use a hole punch for the earring hole at the top. And use scissors to cut the outline of the earring.

6. When the design is cut out simply peel the sticker paper off of the design.
If you would like to know more on how to assemble your earrings once they have been cut out, than check out this “Ultimate guide to faux leather earrings” tutorial I created.
I hope this post has been helpful. If you enjoyed this post than please share it on Pintrest using the image below.

