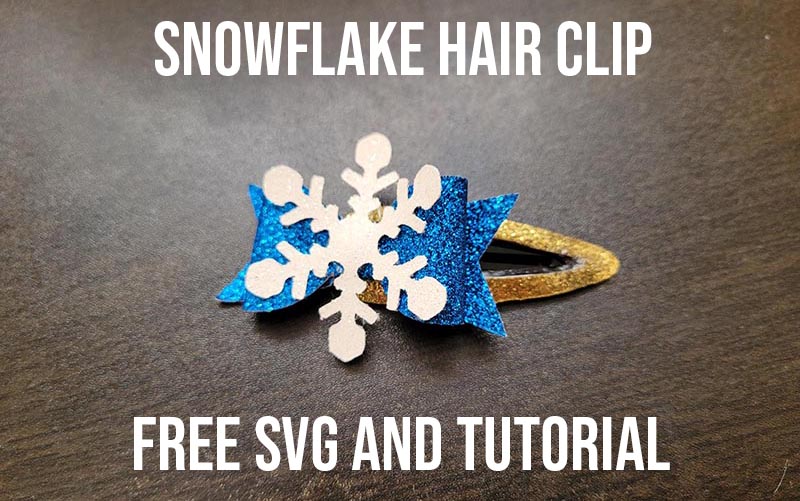
Snowflakes are so pretty and peaceful, and make a great decoration for Christmas time. Why not wear one of these beautiful snowflakes in your hair. This hair clip design is super easy to make with your Cricut machine and some glitter vinyl. You can attach the design easily to an hair clip to make a quick and easy hair accessory.
My post contains some affiliate links so if you make a purchase after clicking on a link I may receive a commission but it will not cost you anything. Read my disclosure here.
To get the free SVG file to make some fun earrings just use the newsletter sign up form below and the SVG cut file will be sent directly to your inbox. Find lots more free SVG’s here.
To continue to the next screen press the green “Make” button.
Step two
In the Prepare screen you will see how the color layers will cut on the mat. Each color will cut out on a seperate mat.
Now cut out a piece of glitter vinyl for each layer slightly larger than you will need. If you have several mats you can prepare them now with each color of glitter vinyl or if you have one mat you will need to load the vinyl after each cut.
This is how you want the fabric to look before you load it into the cutting machine. I recommend putting some transfer tape onto your cutting mat first, sticky side up, this will help keep your mat clean. And you will also need to go around the edge of the vinyl with painters tape to hold it in place. And you want the fabric good side down. I used a purple strong grip cutting mat for cutting a heavier fabric such as glitter vinyl.
Press the green “Continue” button to move to the next screen.
Step three
In the make screen you can choose your cut setting, and blade pressure. In this tutorial I used the “Faux leather (Paper thin)” setting.
Now follow the instructions on your screen on which blade to use. Load your mat and press the flashing “C” button on your machine to cut the fabric.
Here you see all the fabric shapes cut out in each color.
Step four
To assemble the hair clip open the hair clip and place a small dab of hot glue along the edge and press the gold vinyl onto it. It’s important you work with the clip open or the vinyl won’t stick properly. Placing a small amount of glue on the end makes it easier to work with since the glue dries quickly.
Now place a small amount of hot glue along the rest of the hair clip and press the vinyl down.
Below you will see the finished barrette. If you have any stray globs of hot glue you can pick them away or carefully use an exacto knife to cut them away. But most of the barrette will be hidden by the bow so don’t worry about them too much. It’s the shorter end that will be visible.
Step five
Take the blue bow and place a small dot of hot glue on the center back. Fold both ends to meet each other in the middle and press down over the glue to form the bow shape.
Here you see the finished bow shape.
Step six
Now place a small dab of hot glue onto the top of the bow tails and press the bow onto it to form this shape.
Step seven
Take the band and attach it to the back of the bow with a small dab of hot glue. Now wrap it around and glue the other end to the back.
Below is the completed bow, now it’s ready to be attached to the hair clip.
Step eight
Put a small dot of hot glue on the gold hair barrette end.
Now press it onto the bow back.
Below you will see the bow glued onto the barrette.
Step nine
Place a small bit of hot glue onto the center of the back of the white snowflake and press this onto the center of the blue bow.
Now your hair bow is complete and ready to be worn. If you have any stray strings of hot glue, brush them away.
Hi I'm Catherine and I'm so glad you've decided to stop by and make stuff with me! My blog is full of fun project for kids and busy parents.
View all posts by Catherine


